How to use Farm Khata
Step-by-step guides for every screen and option — in simple words, with real screenshots from the app. Use the menu on the left to jump to any topic.
Every screenshot here is a real capture from the app. Signup is just a phone number and a password (no OTP), and there is no Paisa tab.
1 Install the app
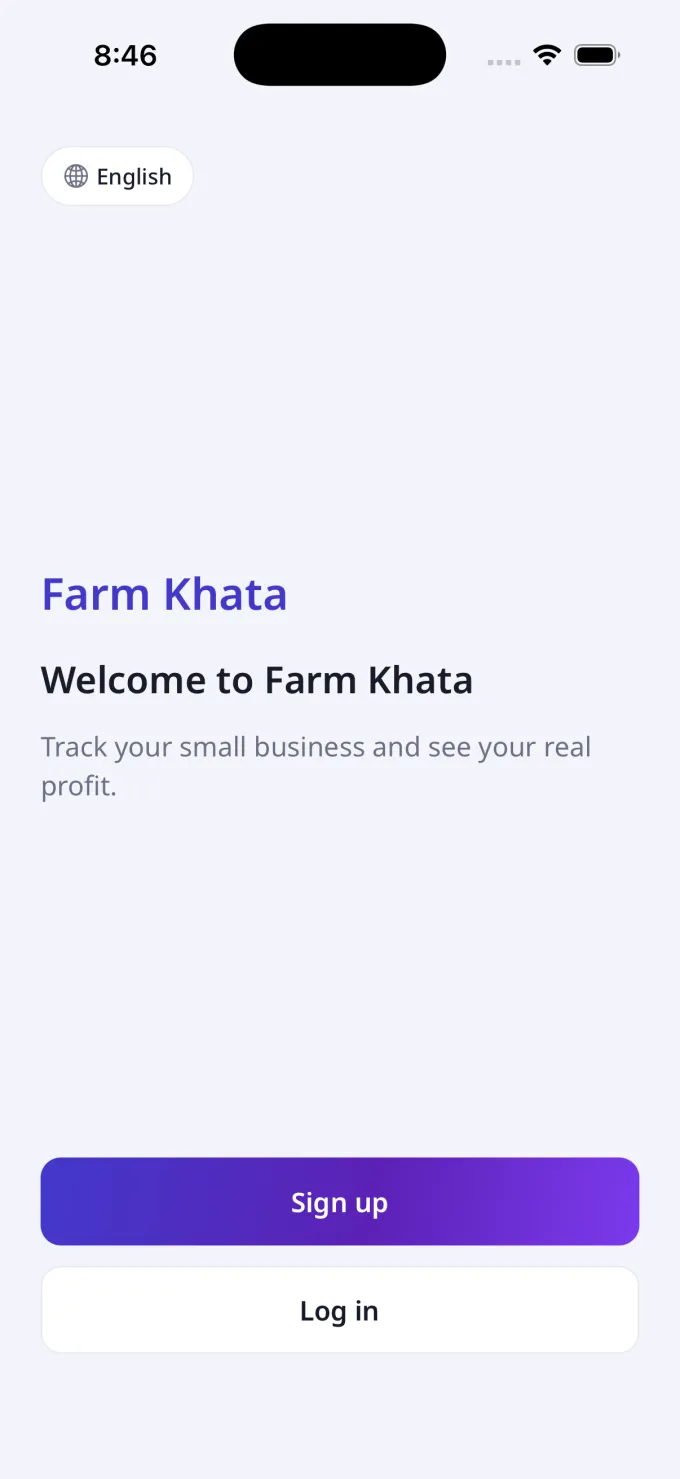
Open Farm Khata and start from the Welcome screen.
- Open Farm Khata. When you're logged out, the app opens on the Welcome screen — the brand Farm Khata, the words “Welcome to Farm Khata” and “Track your small business and see your real profit.”
- You'll see two buttons: Sign up to create a new account, and Log in if you already have one.
- Optional: tap the globe language toggle at the top to change the language before you begin.
2 Sign up with your phone
One phone number and a password — no OTP, no code.
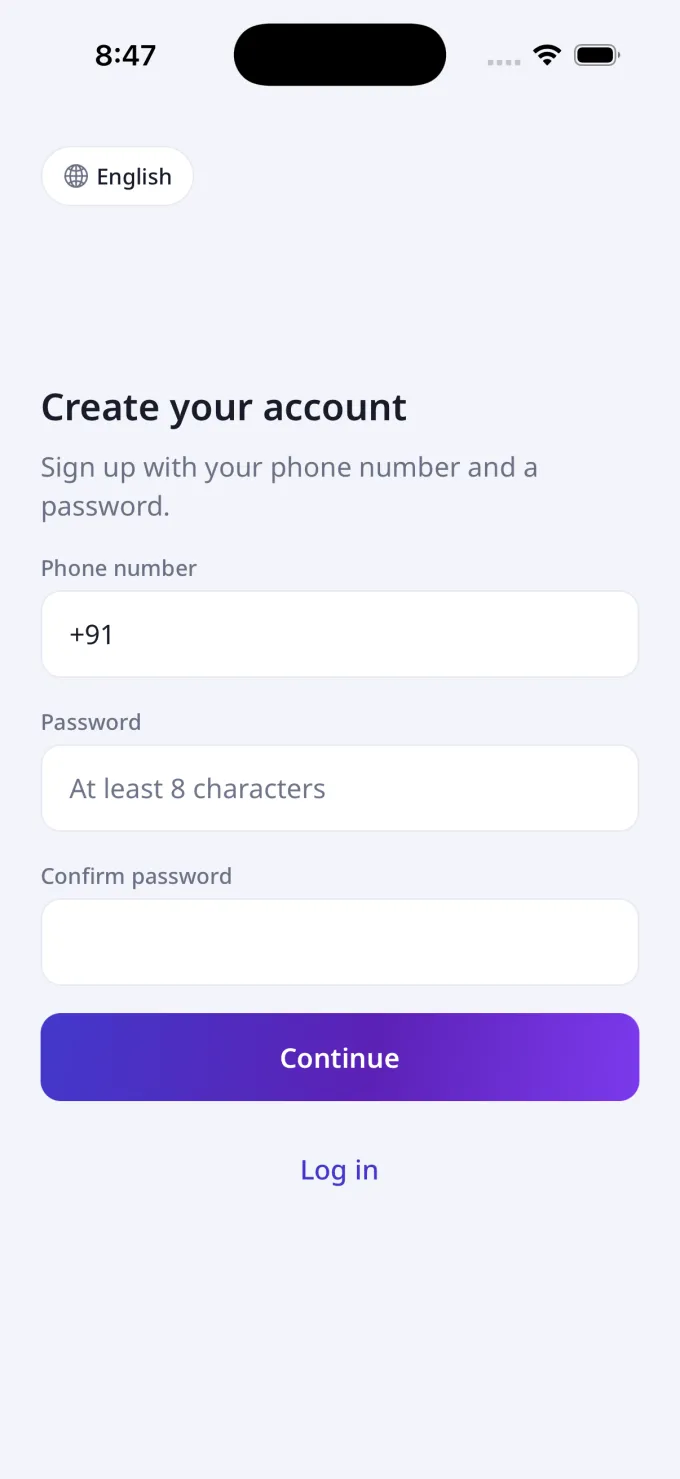
- On Welcome tap Sign up. The “Create your account” screen opens.
- Enter your Phone number in international format — the field starts with +91 (for example +91 90000 00002).
- Type a Password — “At least 8 characters” — then type it again in Confirm password.
- Tap Continue. You're signed in immediately and taken straight to choosing your business.
3 Log in later
Come back anytime with the same phone and password.
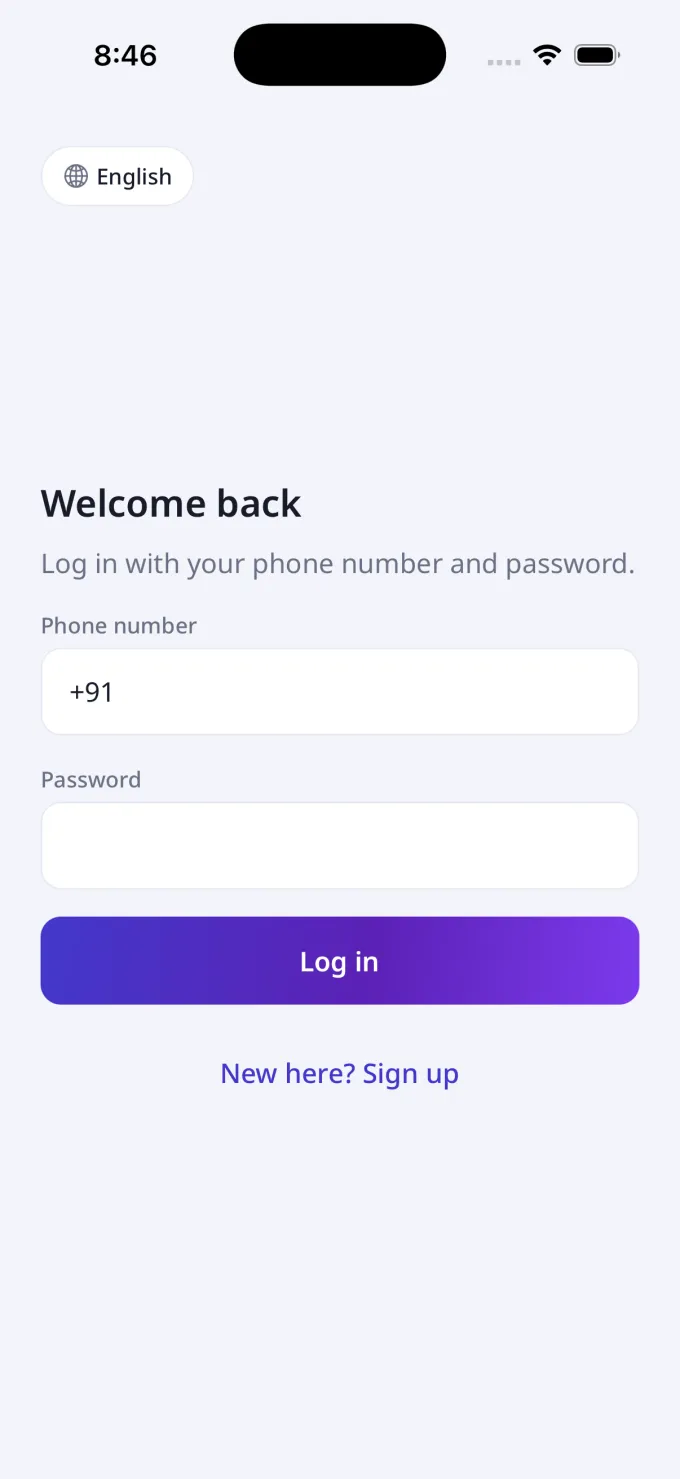
- On Welcome tap Log in to open “Welcome back”.
- Enter your Phone number and Password.
- Tap Log in. You land on your dashboard — or on the business picker if you haven't chosen a business yet.
- New to Farm Khata? Tap New here? Sign up to create an account instead.
4 Pick your business
Choose what you do — this is set once, with a quick confirm.
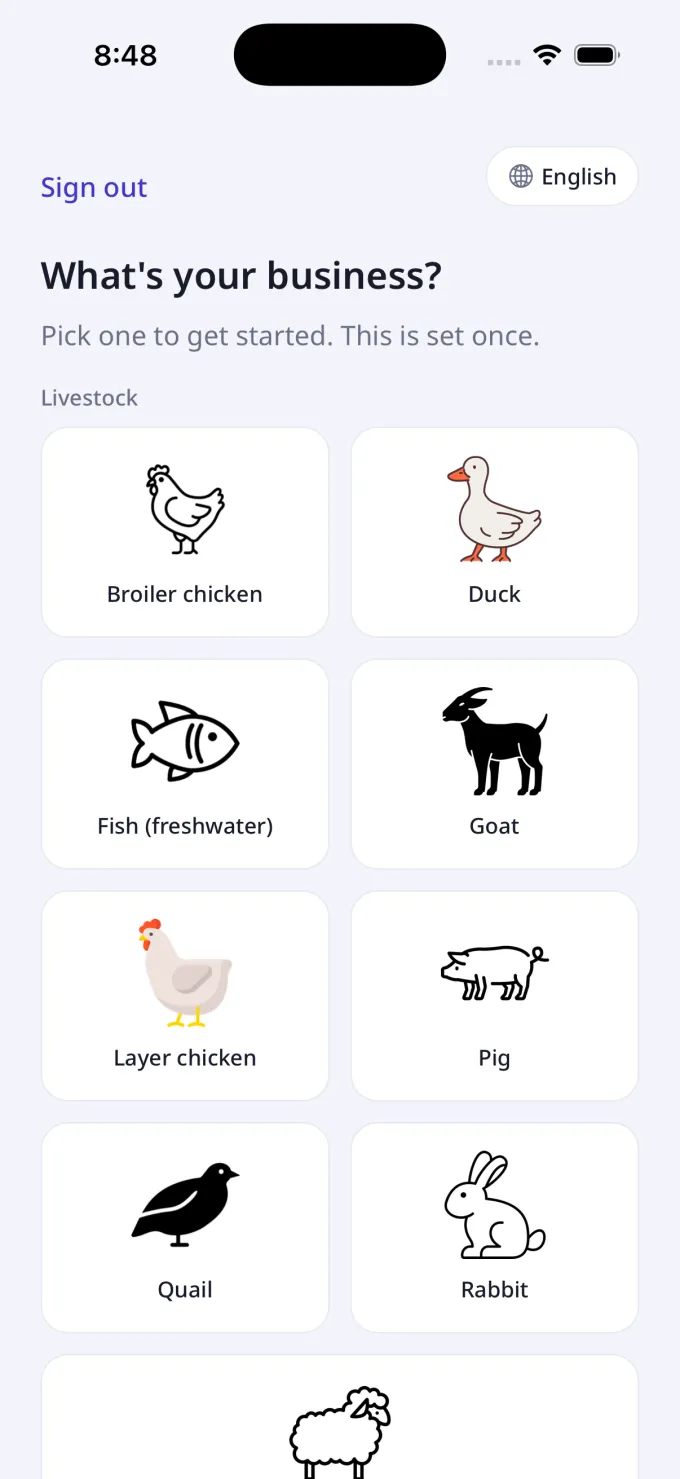
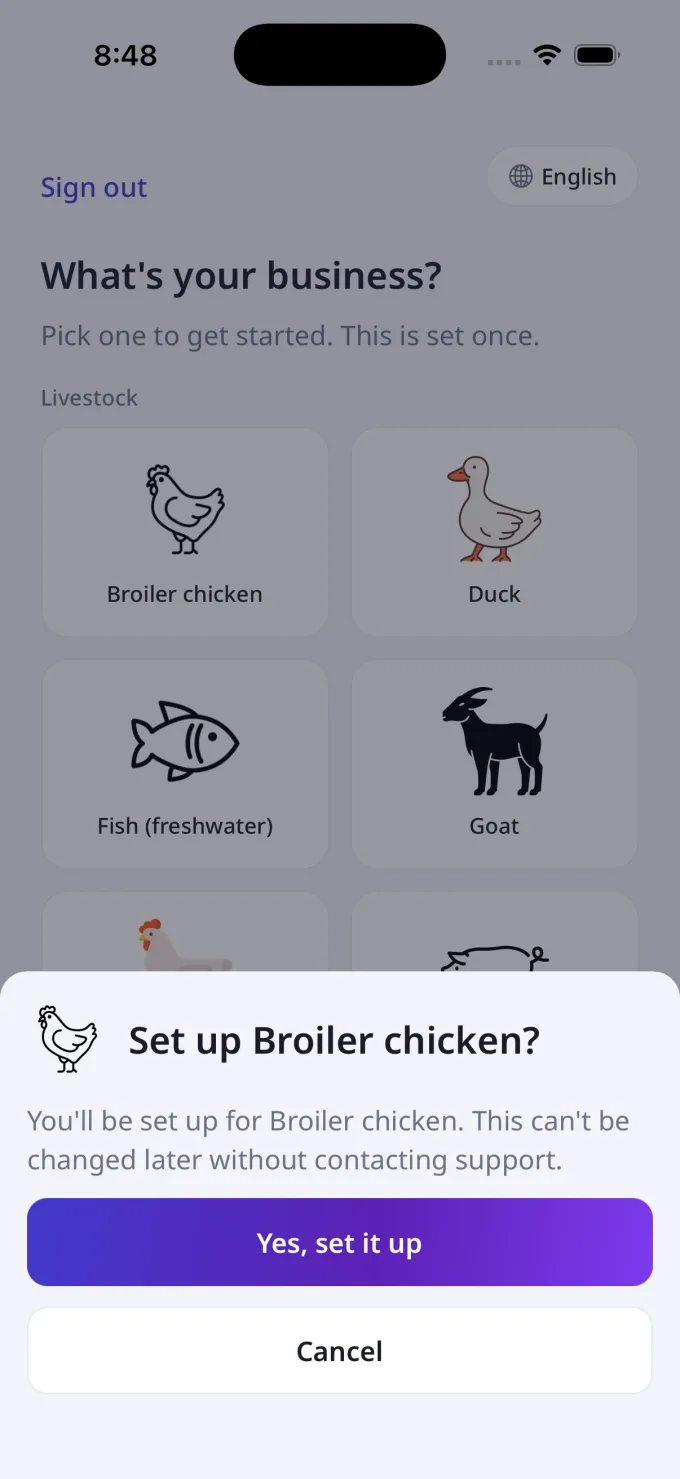
- Right after signup you land on “What's your business?” — “Pick one to get started. This is set once.”
- Browse the businesses grouped under Livestock, Farming and Daily selling. Each card shows its real icon and name.
- Tap the card that matches your business to open the confirm step.
- Tapping a card slides up a confirm sheet — for example “Set up Broiler chicken?”
- Read the warning: “You'll be set up for Broiler chicken. This can't be changed later without contacting support.”
- Tap Yes, set it up to lock it in, or Cancel to go back and pick a different one.
5 Choose language & set location
Pick your language, then set your area for local prices and reminders.
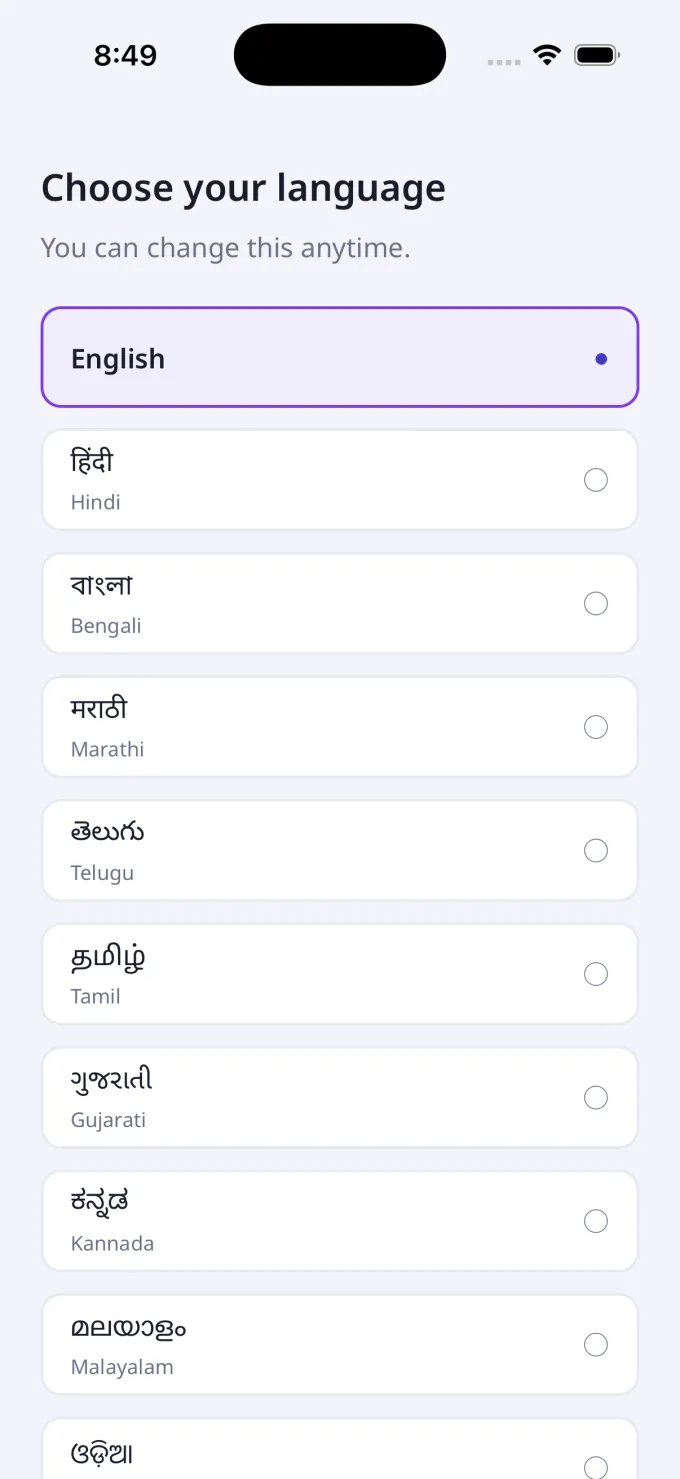
- Livestock businesses are asked to choose a language next: “Choose your language” — “You can change this anytime.”
- Scroll the list of 12 languages — each is shown in its own script with the English name beneath.
- Tap your language and the whole app switches instantly as a live preview. English is selected to start.
- Tap Continue to save it and move on.
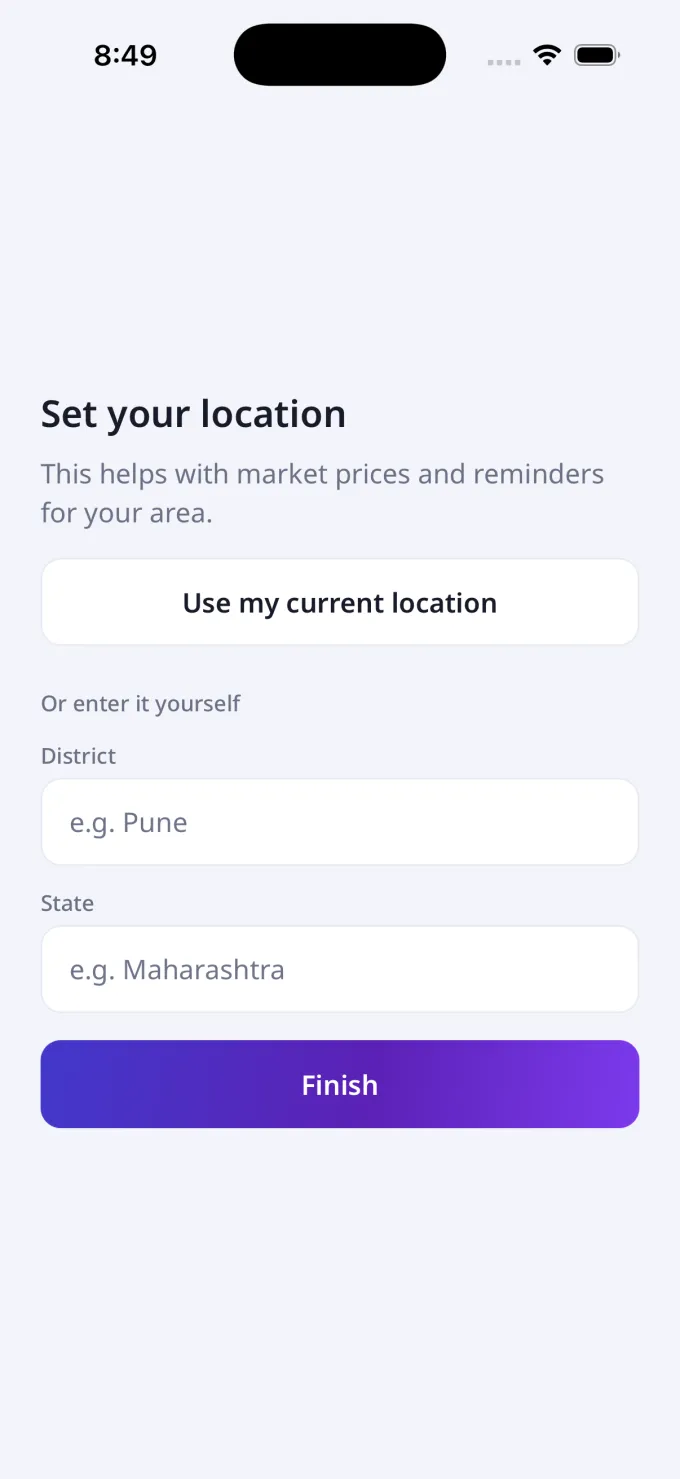
- The last step is “Set your location” — “This helps with market prices and reminders for your area.”
- Tap Use my current location and allow the permission — a 📍 card confirms your detected area.
- Or under Or enter it yourself, type your District (e.g. Pune) and State (e.g. Maharashtra).
- Tap Finish. You land on your dashboard, ready to go.
6 The home screen
Your batch and your live profit, right at the top.
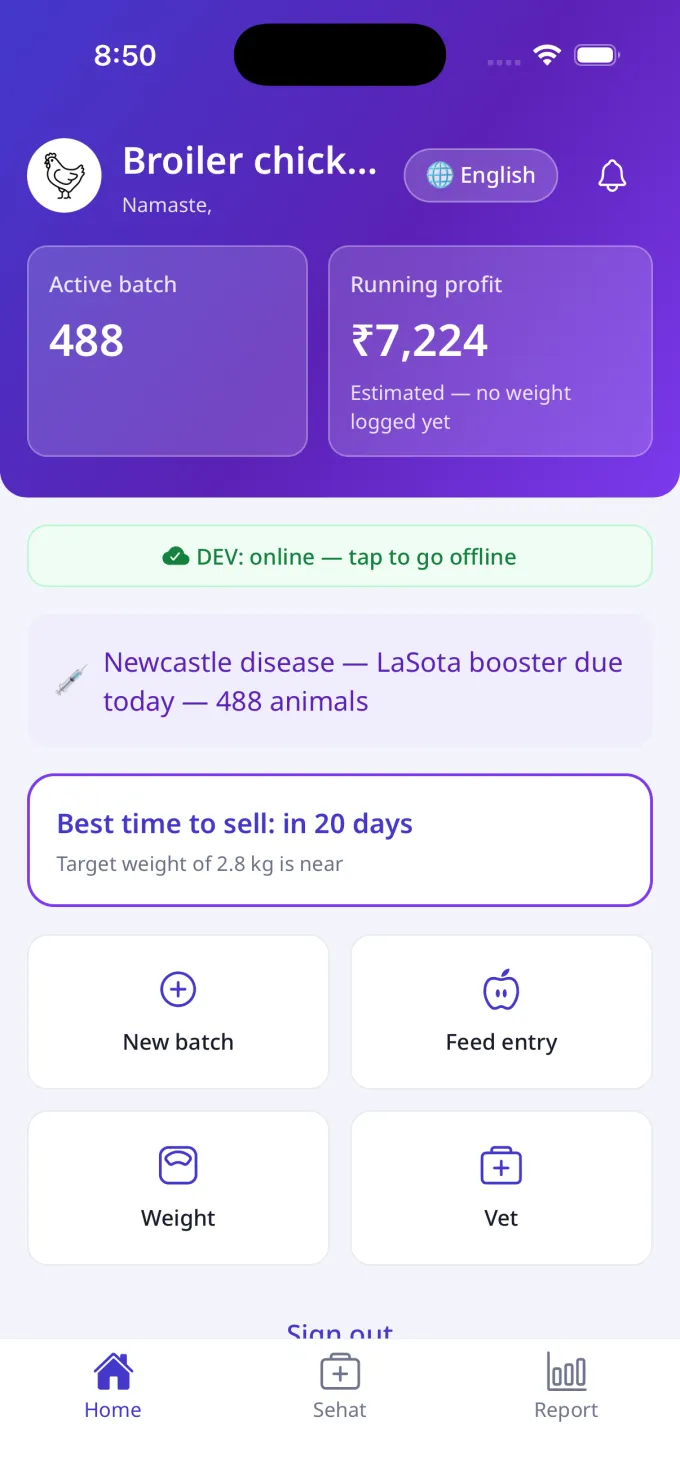
- The top of Home shows two cards: Active batch (how many animals are alive) and Running profit (your live profit so far).
- Below that you may see a vaccine reminder, a Best time to sell card, and quick-action tiles: New batch, Feed entry, Weight and Vet.
- Tap the Active batch card to open your batch. Tap the bell (top-right) to jump to Sehat reminders. The livestock app has three tabs at the bottom — Home, Sehat and Report.
7 Create a batch by voice
Speak it — the app fills the form for you.
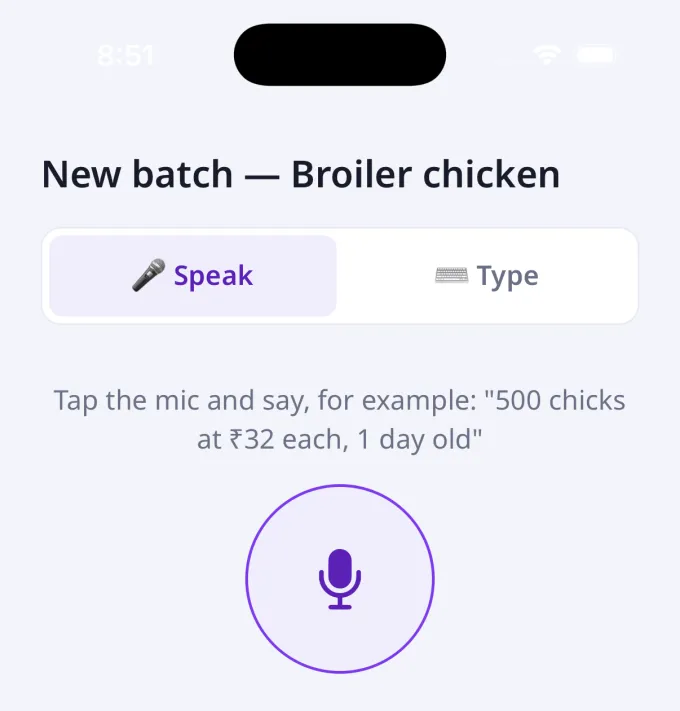
- On Home tap New batch. Keep the Speak tab selected.
- Tap the big mic and say it naturally in your language — for example, “500 chicks at ₹32 each, 1 day old.” Tap the mic again to stop.
- The app listens, understands the numbers, and fills in the count, rate and age for you.
8 Create a batch by typing
Prefer to type? Every screen has a Type option.
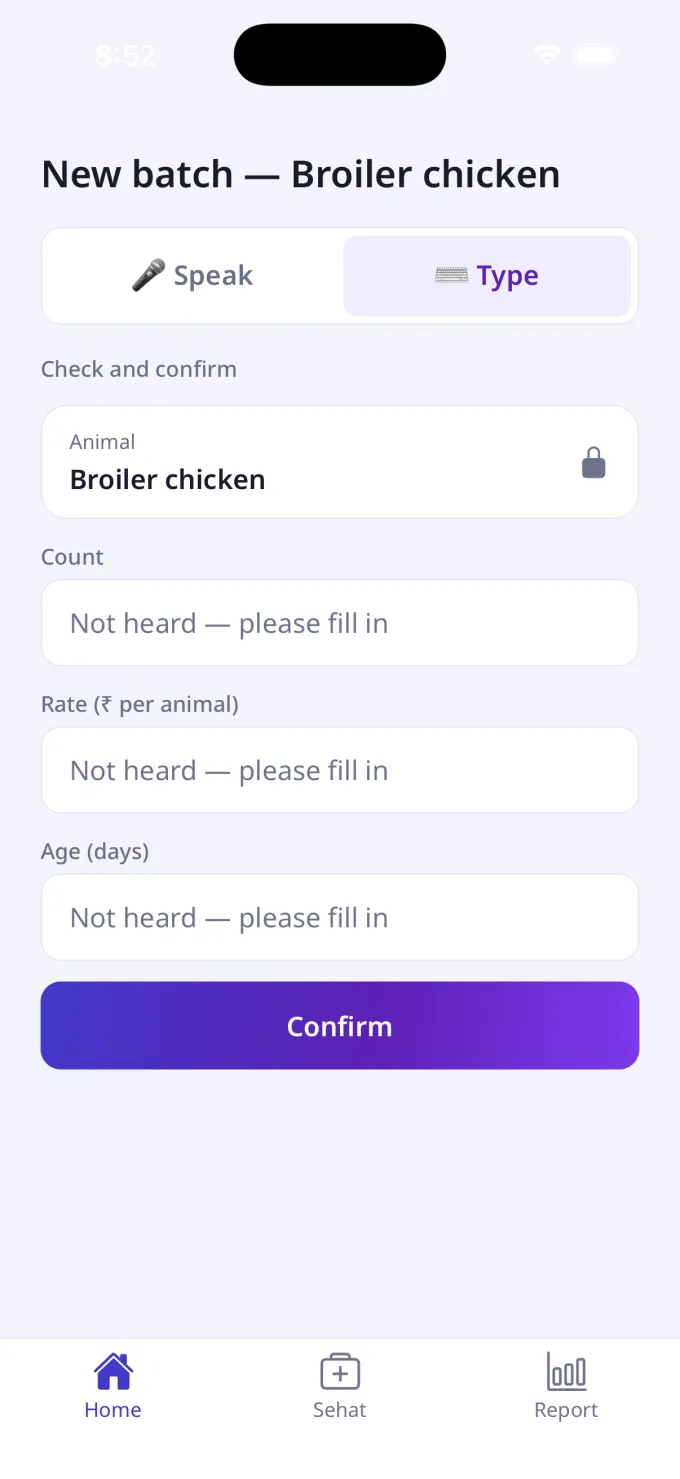
- On the New batch screen, tap the Type tab.
- Fill in the boxes: Count, Rate (₹ per animal) and Age (days). The animal is fixed to your business and cannot be changed.
- Tap Confirm to save.
9 The confirm step
Nothing is saved from your voice until you check it.
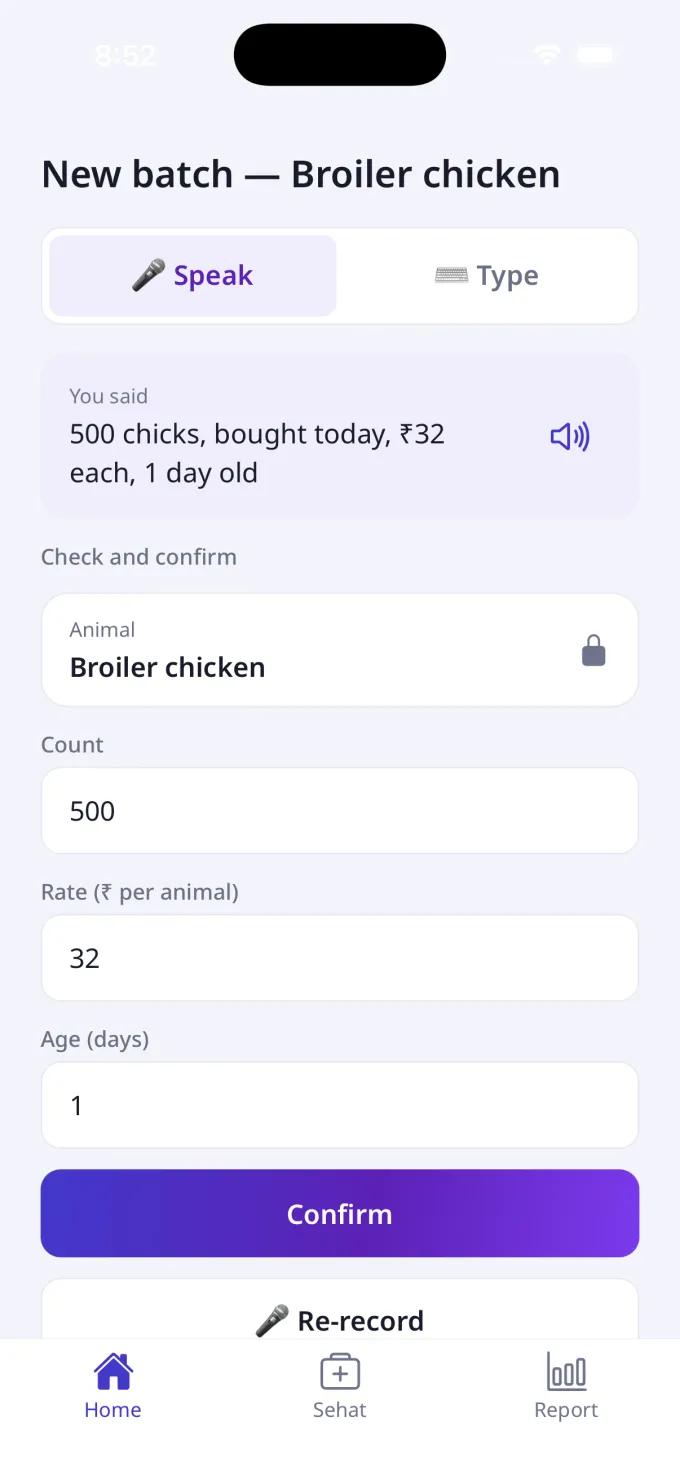
- After you speak, the app shows “You said…” and reads the summary back to you aloud (tap the speaker to hear it again).
- It fills in the fields — count, rate, age — under Check and confirm. Wrong number? Tap the field and fix it.
- All correct? Tap Confirm to save. Want to say it again? Tap Re-record.
10 Daily entries — feed, weight, medicine, deaths, expenses
Log what happened each day — by voice or typing.
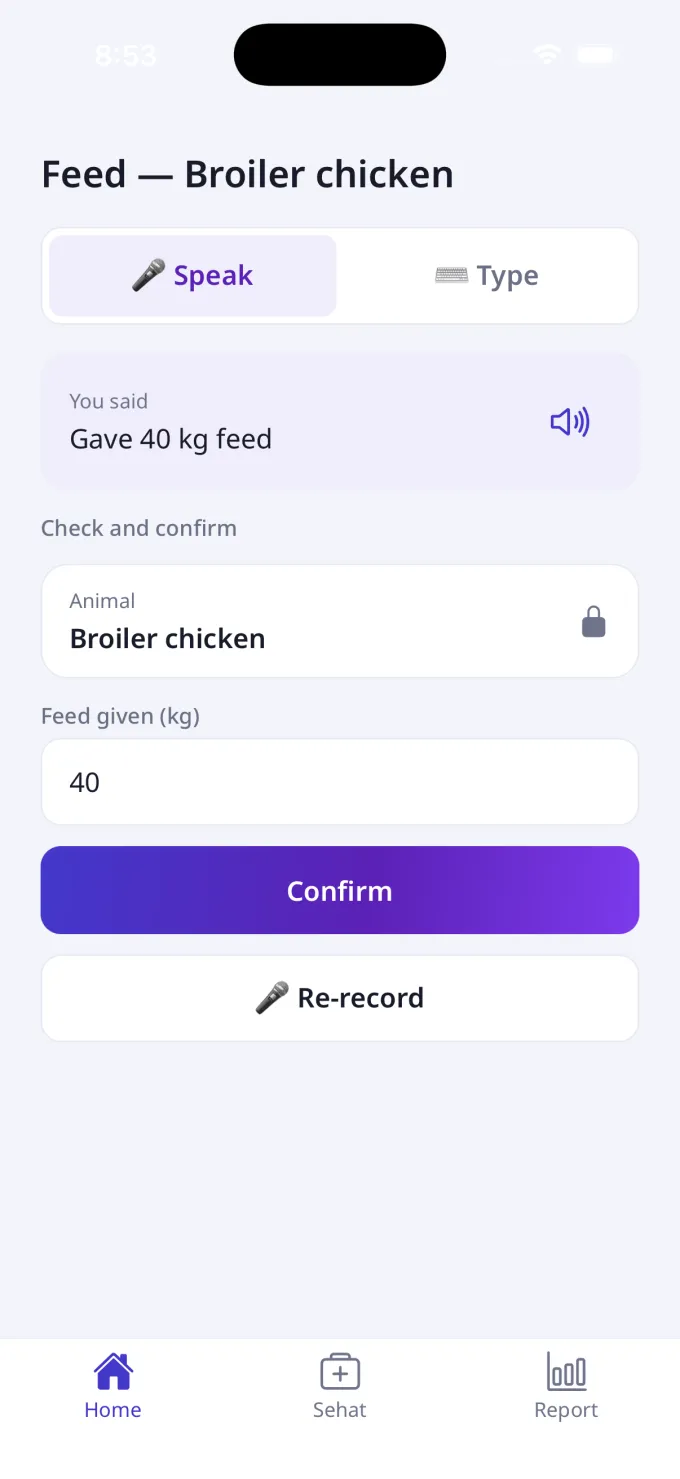
- From Home tap Feed entry or Weight, or open your batch and use the chips: Feed, Weight, Deaths, Expense, Medicine.
- Speak or type the value — for example “Gave 40 kg feed.” The app shows it back and you confirm.
- Weight makes your profit exact instead of estimated. Deaths updates the alive count automatically. Medicine and Expense add to your costs.
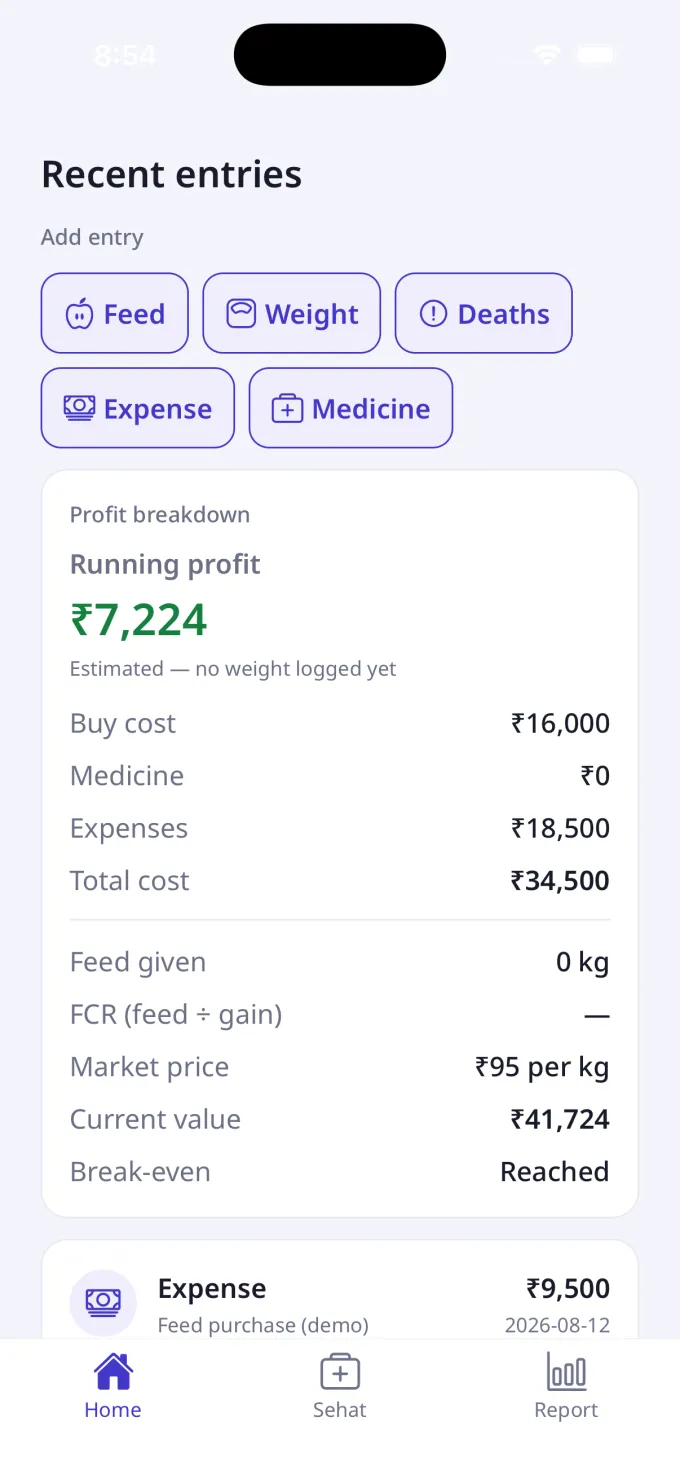
- Tap the Active batch card on Home to open the batch. At the top are the Add entry chips; below is a live profit breakdown; and under that, your recent entries in date order.
11 Profit, FCR & break-even
The real hisab — not just money in and out.
- The profit card shows your Running profit, then the full breakdown: Buy cost, Medicine, Expenses and Total cost.
- Below that: Feed given, FCR (feed ÷ gain), the current Market price, your batch's Current value and whether you've reached break-even.
12 Reports
Every batch, with profit at a glance.
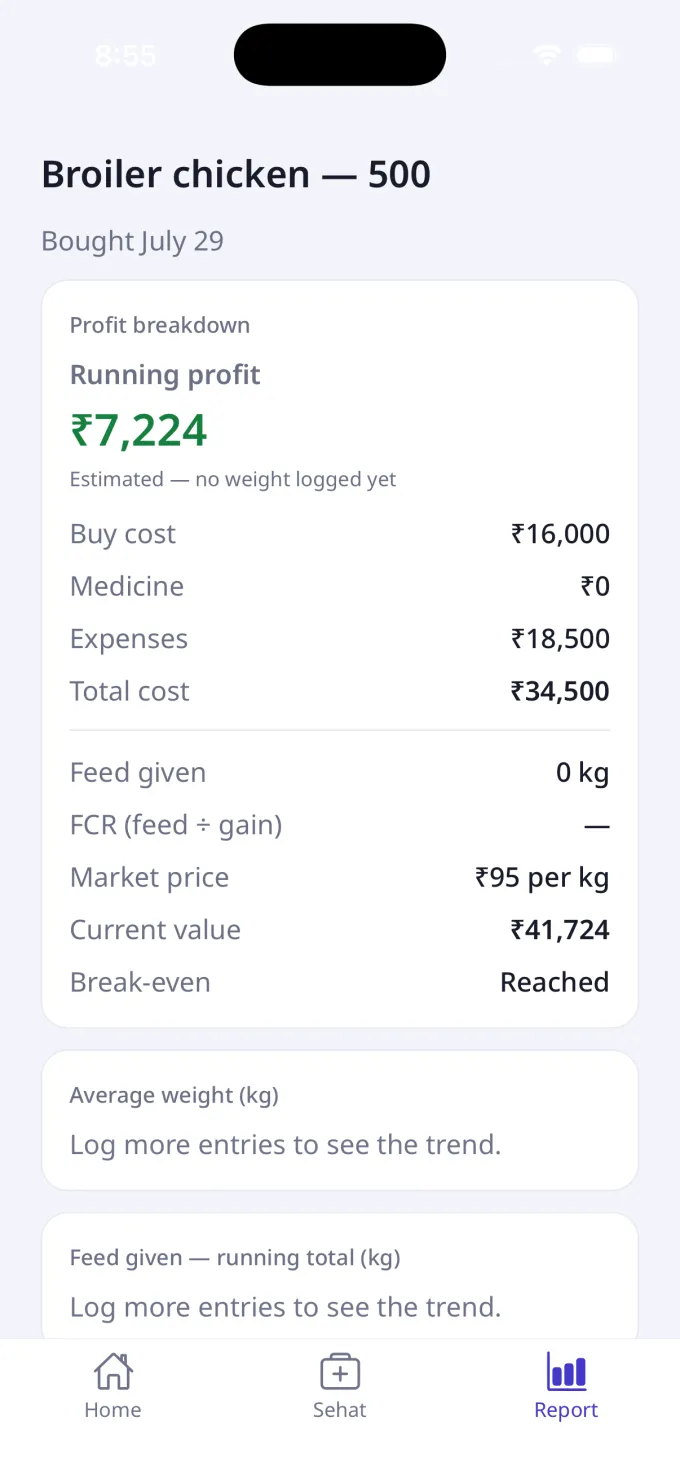
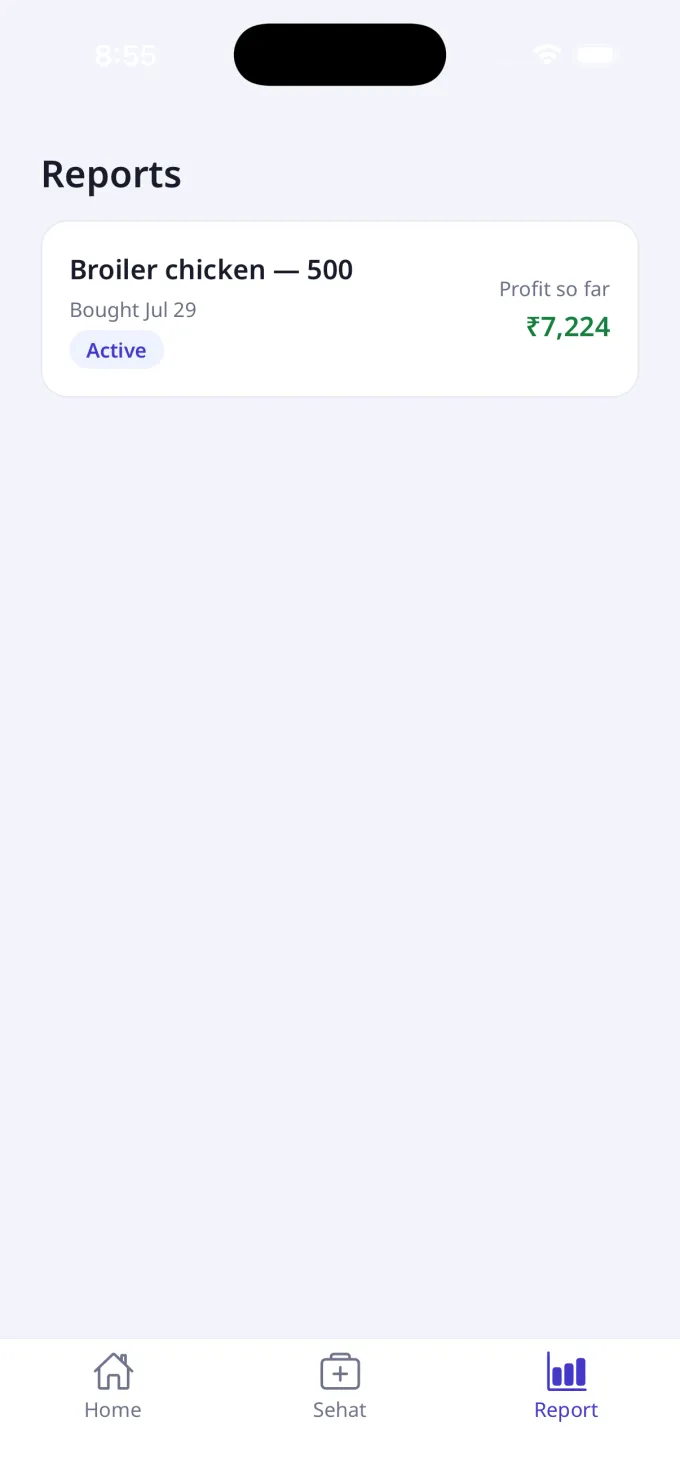
- Tap the Report tab. Each batch is a card showing its name, buy date, status and profit so far.
- Tap a batch to open its full report — the profit breakdown plus weight and feed trend charts as you log more entries.
13 Vaccine & deworming reminders
The right vaccine, on the right day.
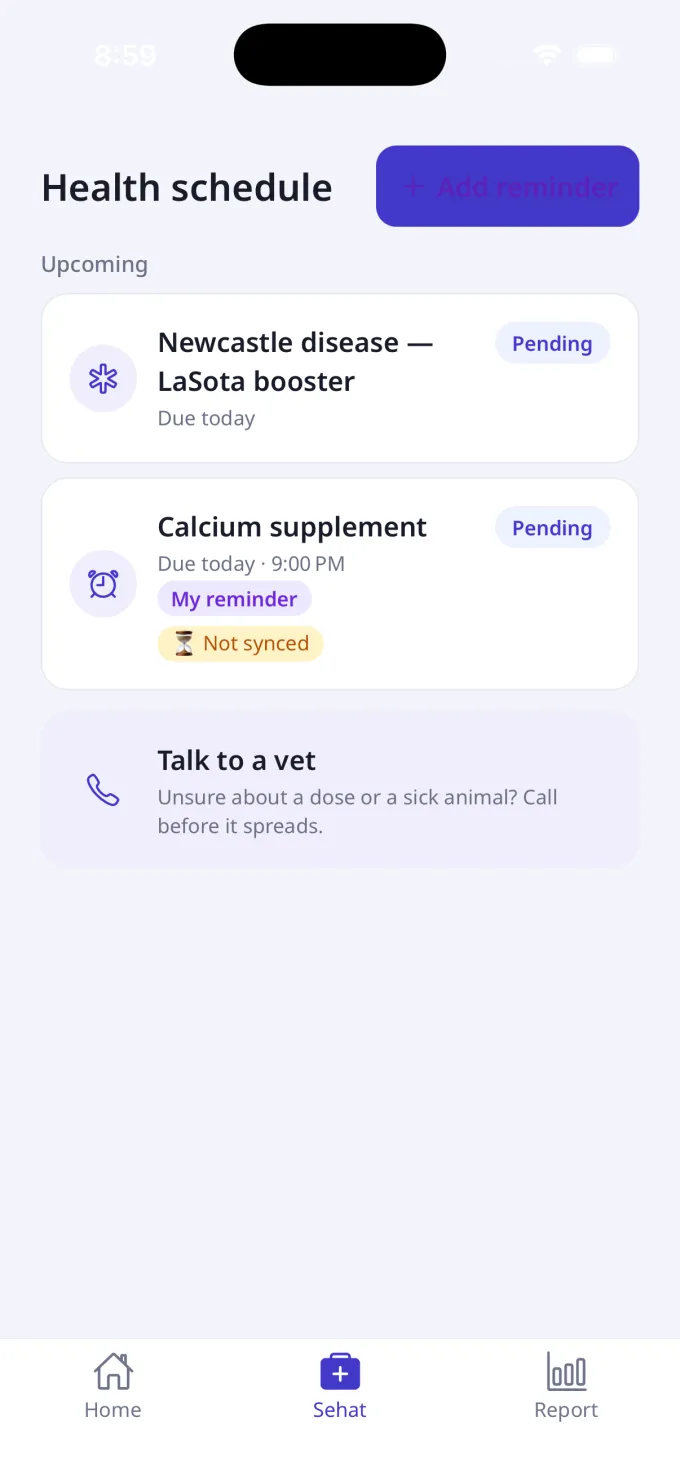
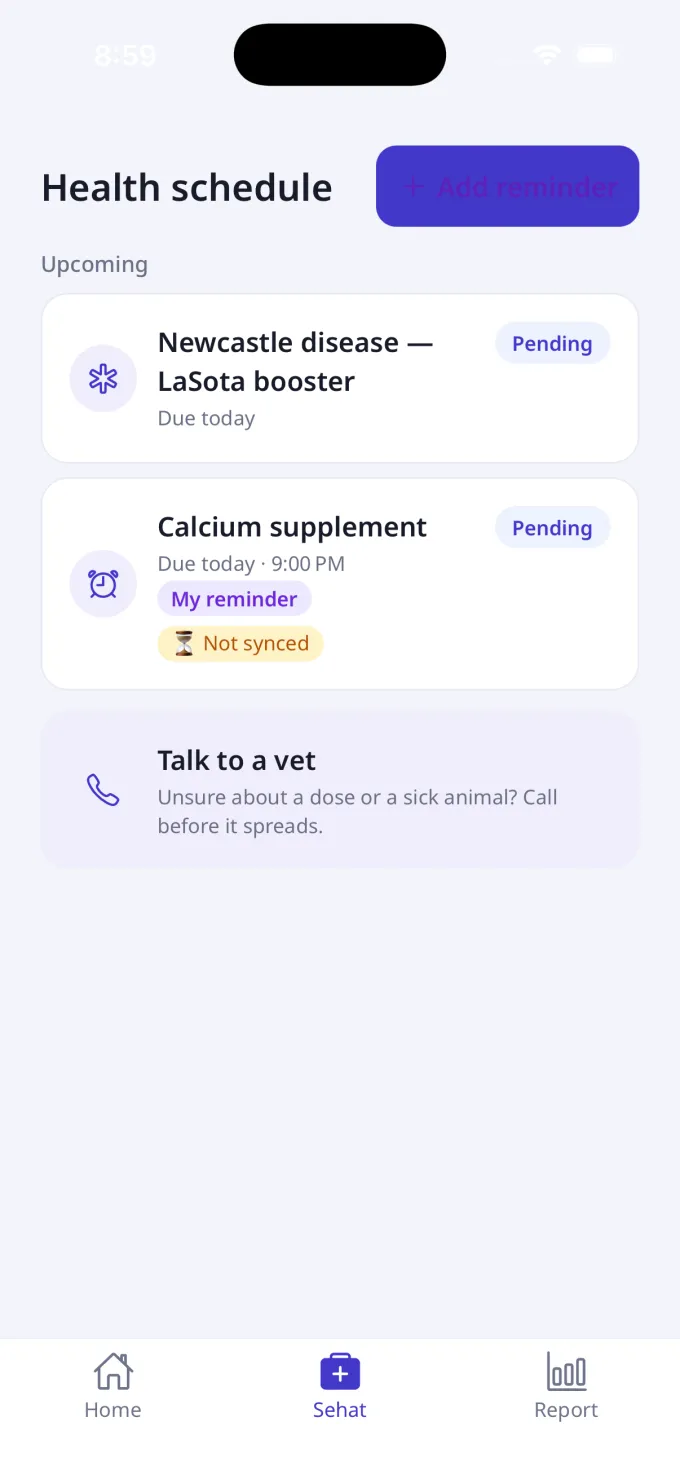
- Tap the Sehat tab. When you create a batch, the app builds a health schedule for your animal automatically.
- Each reminder shows what's due and when — for example “Newcastle disease — LaSota booster, Due today.”
- There's also a Talk to a vet card for when you're unsure about a dose or a sick animal.
14 Your own reminder — date & time
Set a reminder for anything, at any time.
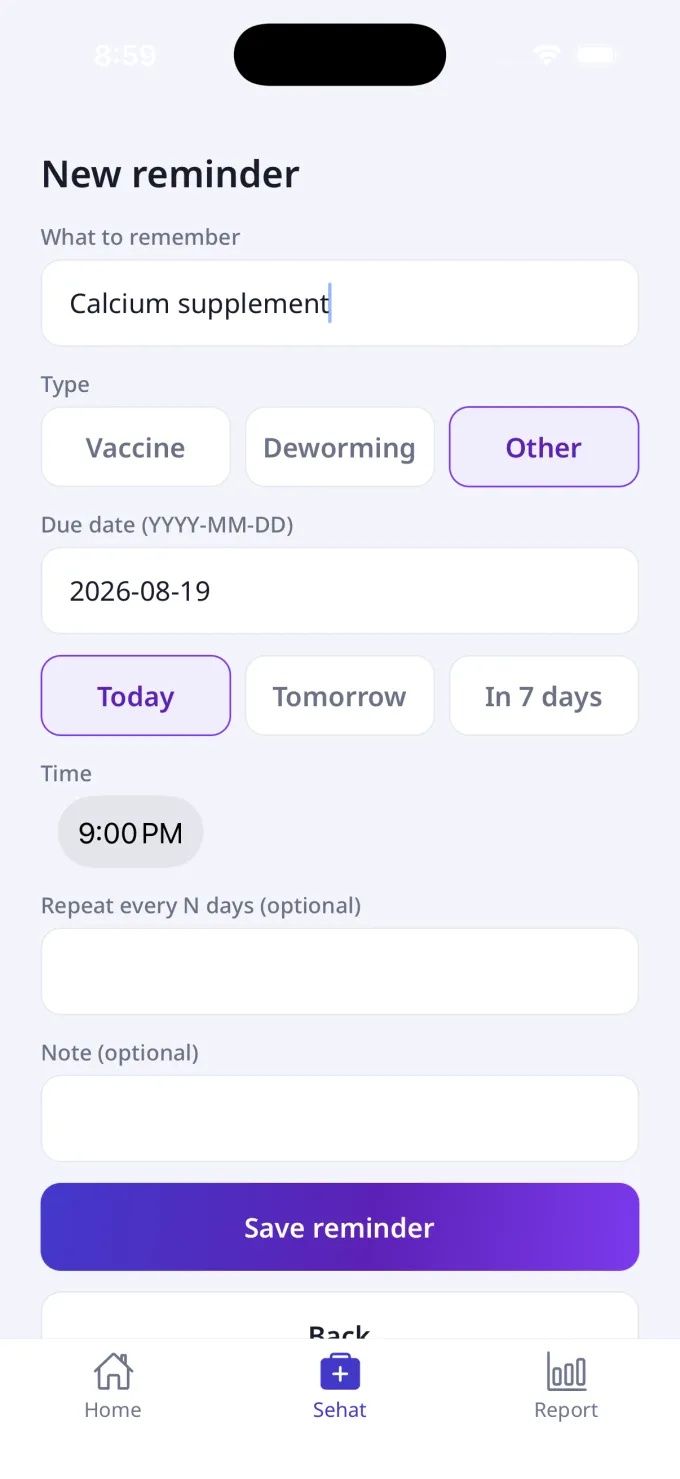
- On the Sehat tab tap Add reminder.
- Type what to remember, choose a type (Vaccine, Deworming or Other), and pick a due date — use Today, Tomorrow, In 7 days or your own date.
- Set a Time, optionally repeat every N days, add a note, and tap Save reminder.
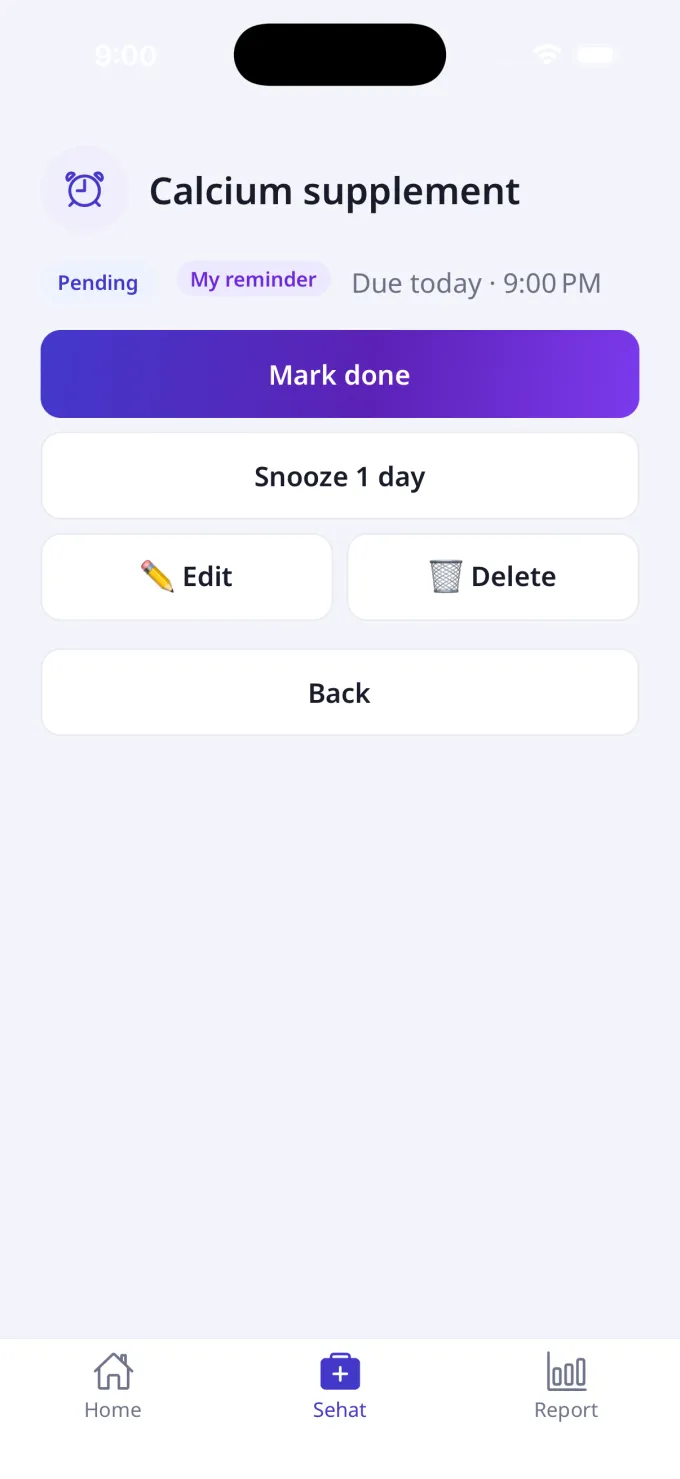
- Tap any reminder to open it. You'll see its status, type and due time.
- Tap Mark done when it's complete, or Snooze 1 day to move it on. You can also Edit or Delete it.
15 Best time to sell
Sell when it pays the most.
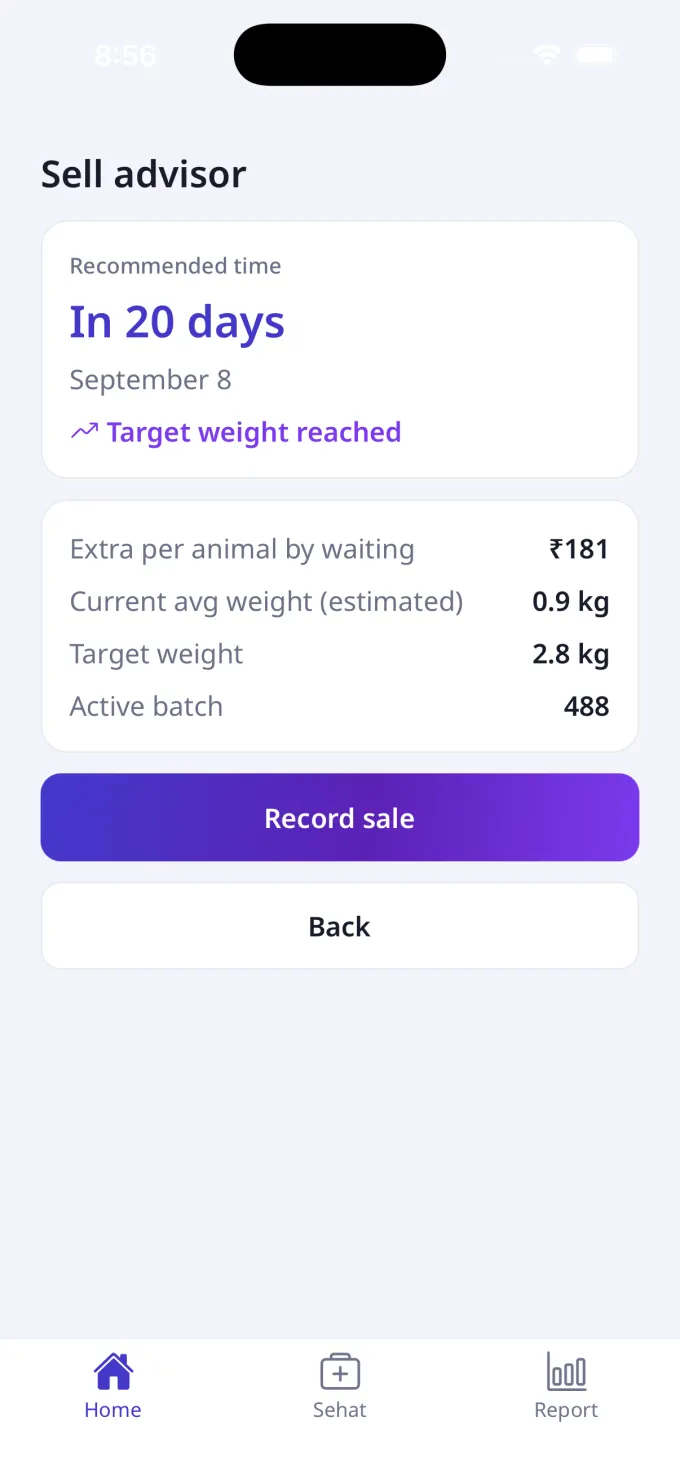
- When the app has enough data, Home shows a Best time to sell card. Tap it to open the Sell advisor.
- It shows the recommended time, the extra you'd earn per animal by waiting, your current and target weight, and the batch size.
16 Record a sale
Close the batch and see your final profit.
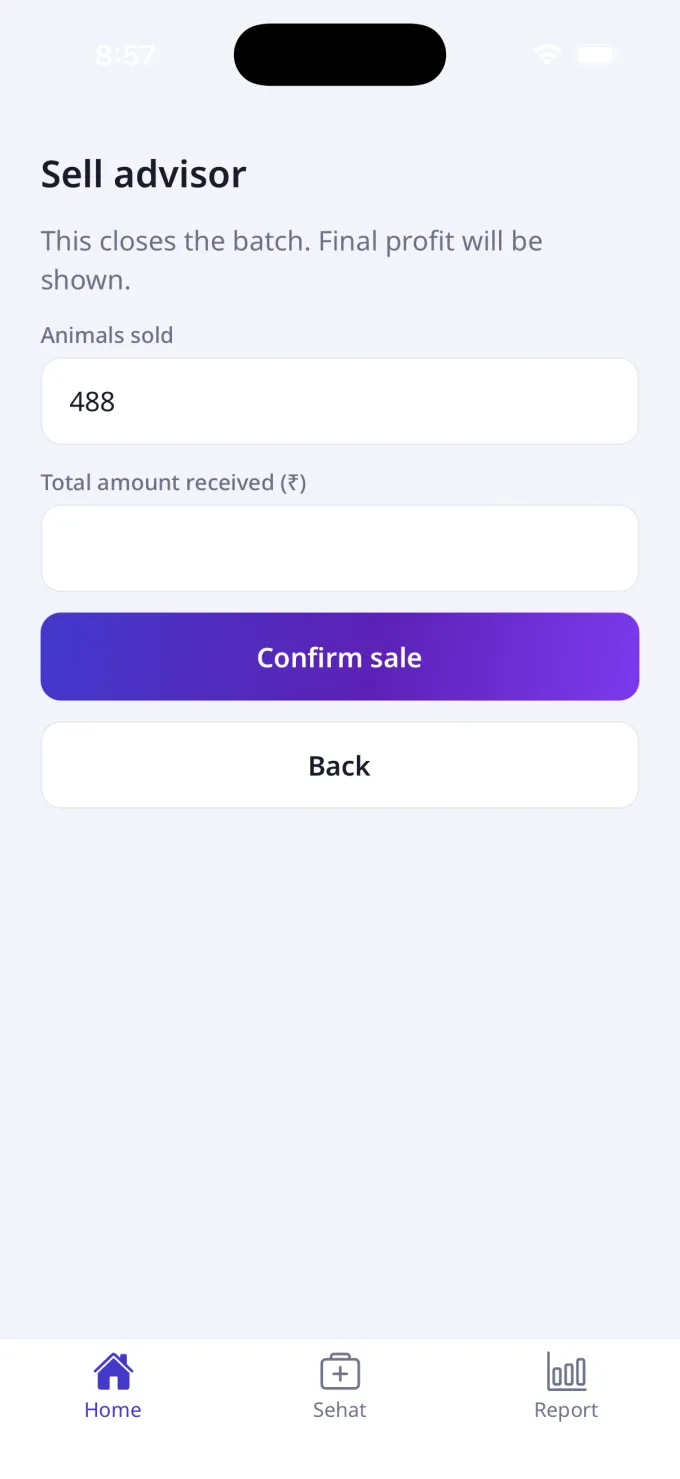
- On the Sell advisor tap Record sale.
- Enter animals sold and the total amount received, then tap Confirm sale. This closes the batch and shows your final profit.
17 The home screen
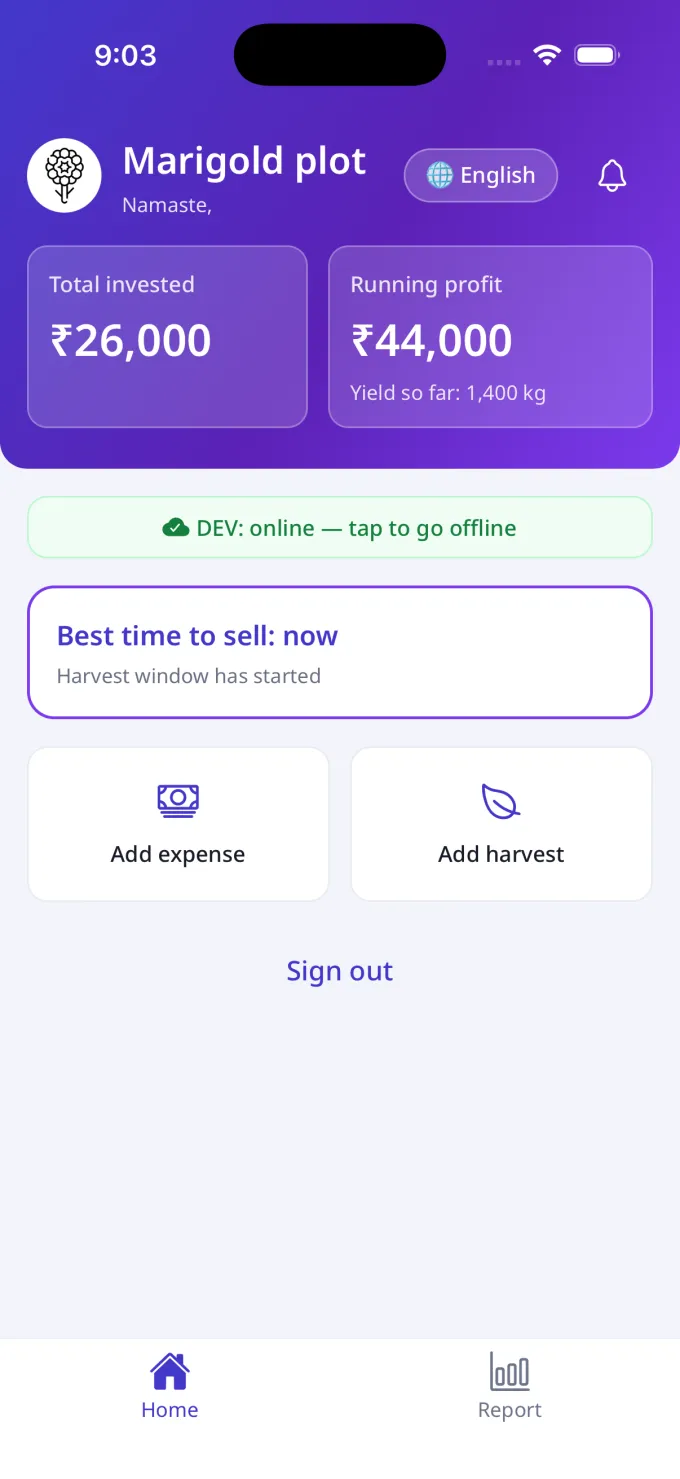
Your plot and your live profit, right at the top.
- The header shows your plot name and greeting. Below it sit two cards: Total invested (your total cost so far) and Running profit (your live profit), with a caption like “Yield so far: N kg” once you start harvesting.
- When your crop has a guide, a Best time to sell card tells you when to sell and why.
- At the bottom are two quick actions: Add expense and Add harvest. Tap the Total invested card to open the full cycle report. The farming app has two tabs at the bottom — Home and Report.
18 Add a plot & get an estimate
Enter your area and the app estimates plants, cost and income for you.
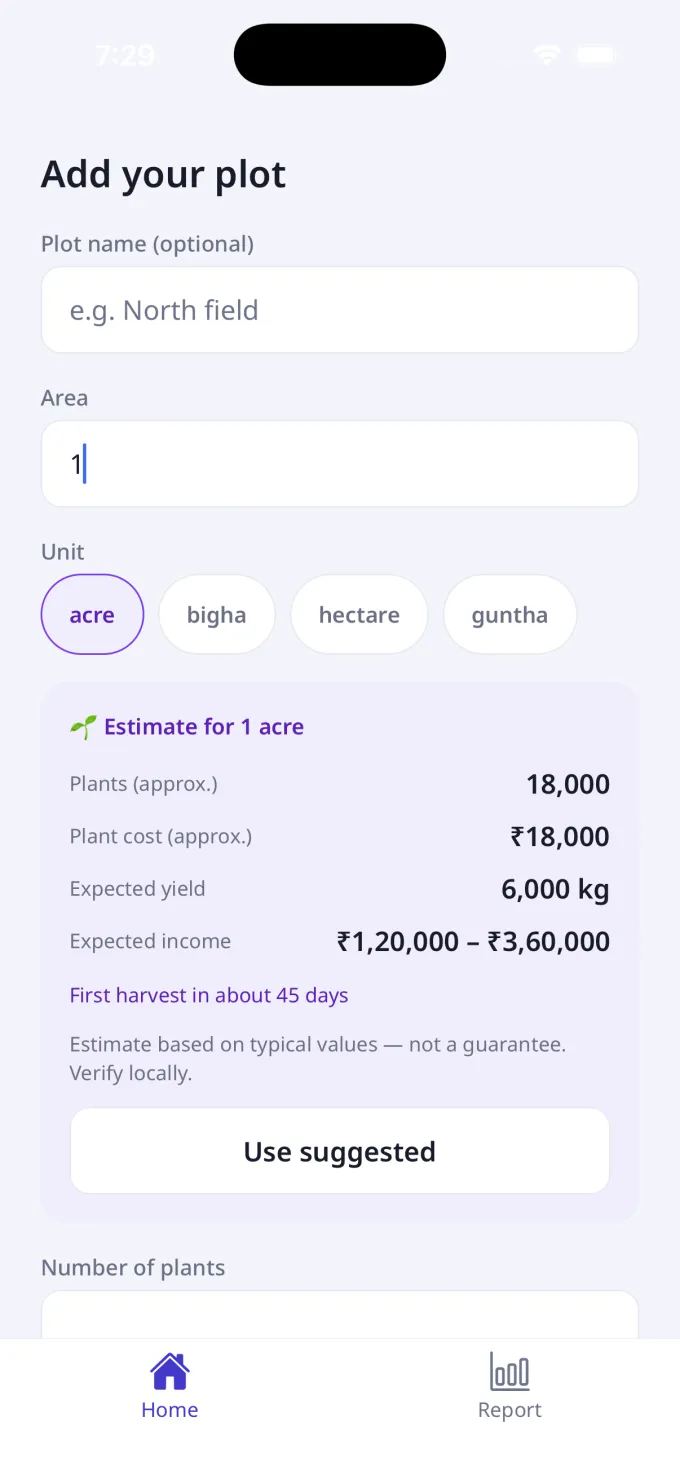
- On Home tap Add your plot. Give it a Plot name (optional) like “North field”.
- Enter the Area — just the number — and pick a Unit: acre, bigha, hectare or guntha (acre is selected by default).
- A moment later an Estimate for 1 acre card appears, showing Plants (approx.), Plant cost (approx.), Expected yield and Expected income (a range), with a note like “First harvest in about 45 days”.
- Tap Use suggested to auto-fill Number of plants and Plant / seed cost (₹), or type your own numbers. Keep the Sowing date as today and tap Save plot.
19 Log an expense
Speak or type each cost — seeds, fertilizer, plowing, labour.
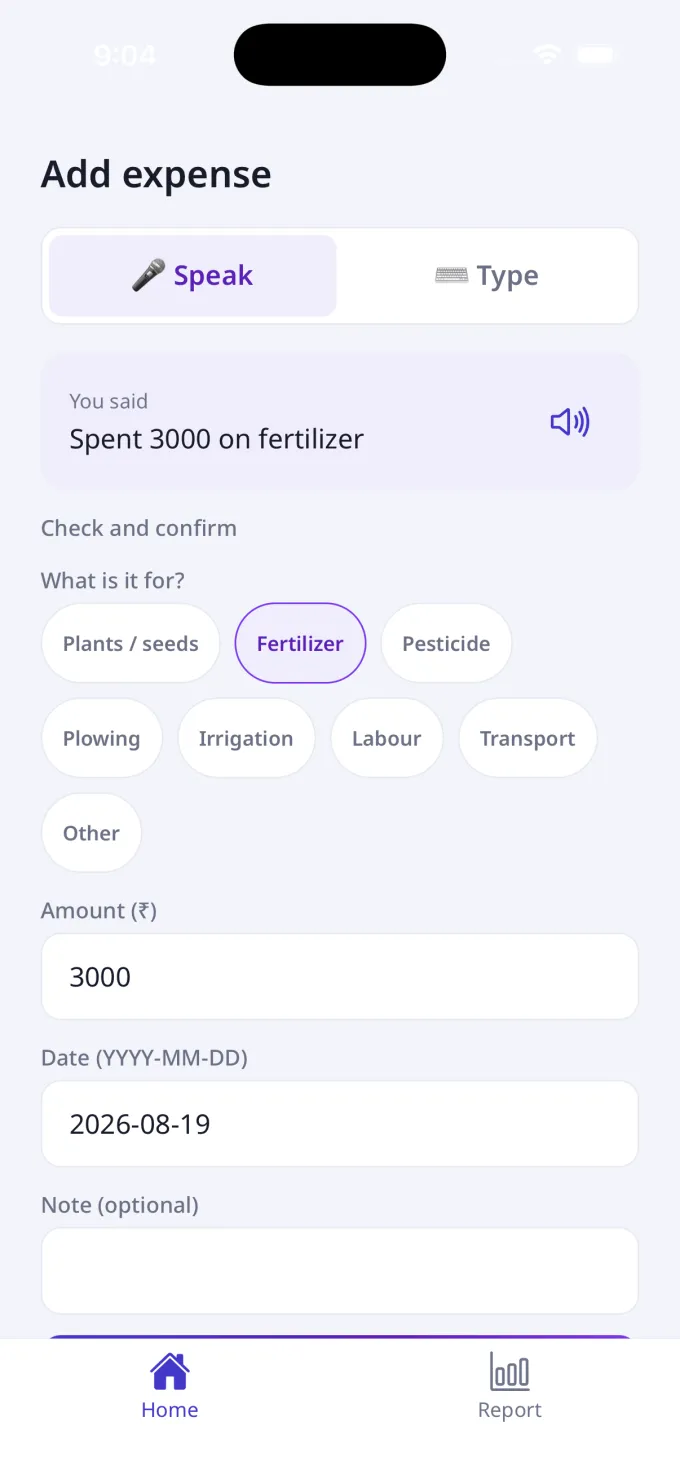
- On Home tap Add expense. Keep 🎤 Speak selected and tap the mic — say it naturally, e.g. “Spent 3000 on fertilizer.” Or tap ⌨️ Type to enter it by hand.
- The app shows “You said…” and moves to Check and confirm, reading back what it heard.
- Under What is it for? pick a category chip: Plants / seeds, Fertilizer, Pesticide, Plowing, Irrigation, Labour, Transport or Other.
- Check the Amount (₹) and Date, then tap Confirm. You return to Home and the cost is added to your plot.
20 Log a harvest
Record every pick and sale — crops are harvested many times.
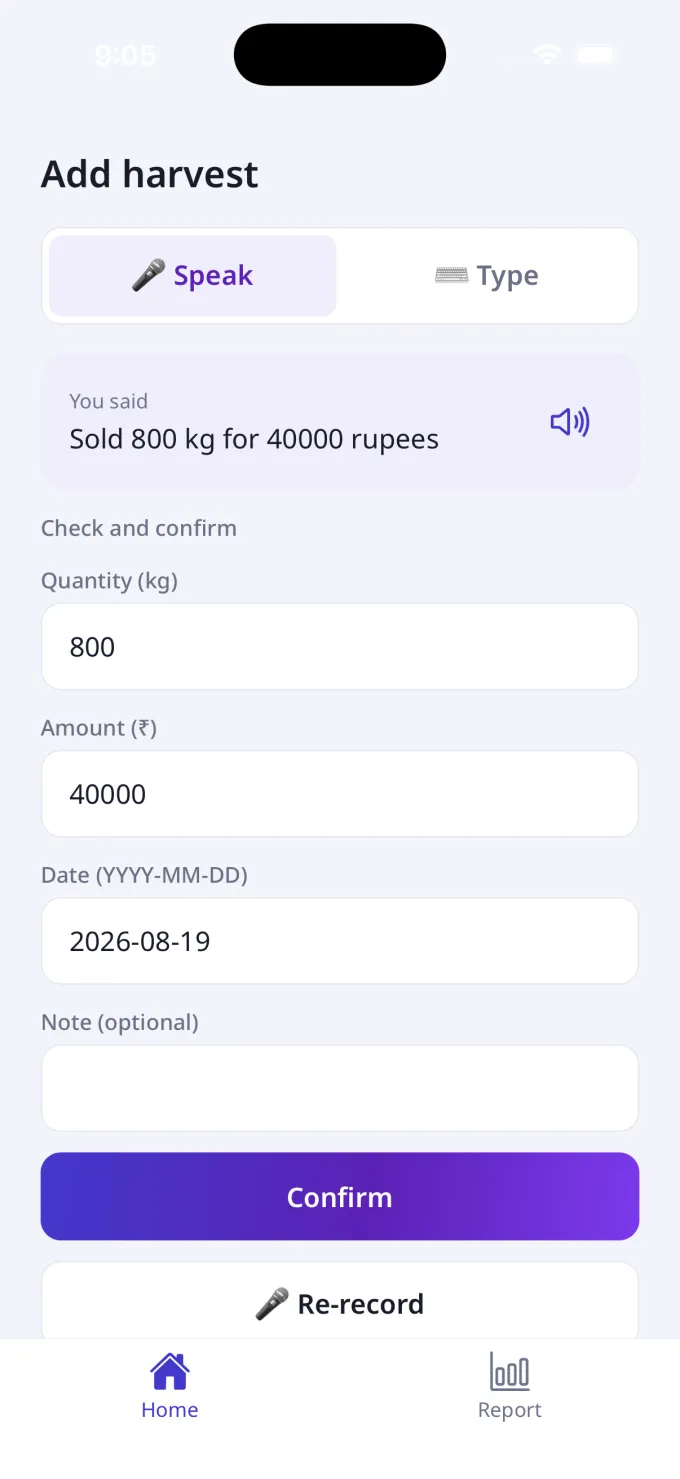
- On Home tap Add harvest. With 🎤 Speak selected, tap the mic and say, e.g. “Sold 800 kg for 40000 rupees.” Or switch to ⌨️ Type.
- On Check and confirm, review the Quantity (kg) and Amount (₹) the app filled in, and set the Date if the harvest was on a different day.
- Tap Confirm. You'll see Harvest saved — tap Add another harvest to log the next pick, or Back to return.
21 Reports
Every plot, with profit at a glance.
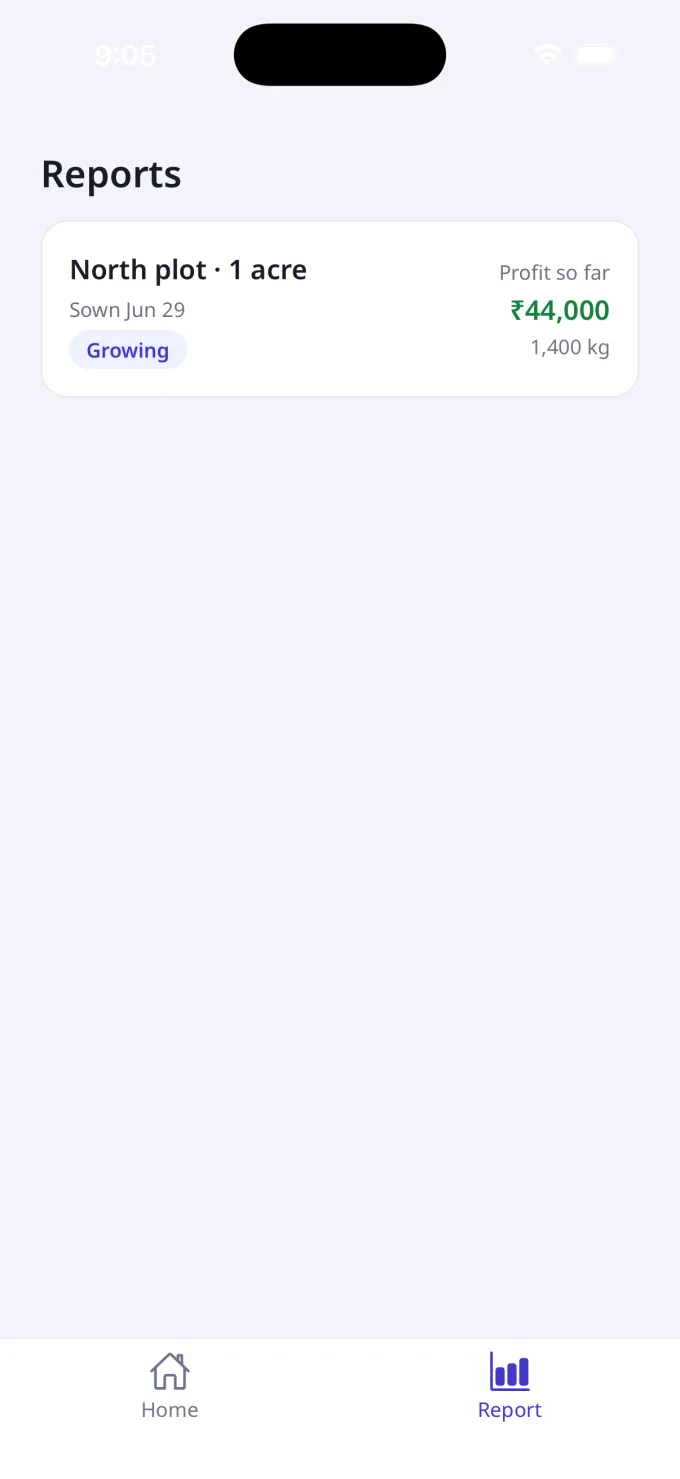
- Tap the Report tab. Each cycle is a card — for example “North plot · 1 acre” — with a Sown … date line.
- The card shows a Growing status chip and, on the right, Profit so far ₹… with the yield in kg.
- Tap any card to open that cycle's full report.
22 Cycle report & ending a cycle
The full hisab for one plot — cost, income, per-acre and profit.
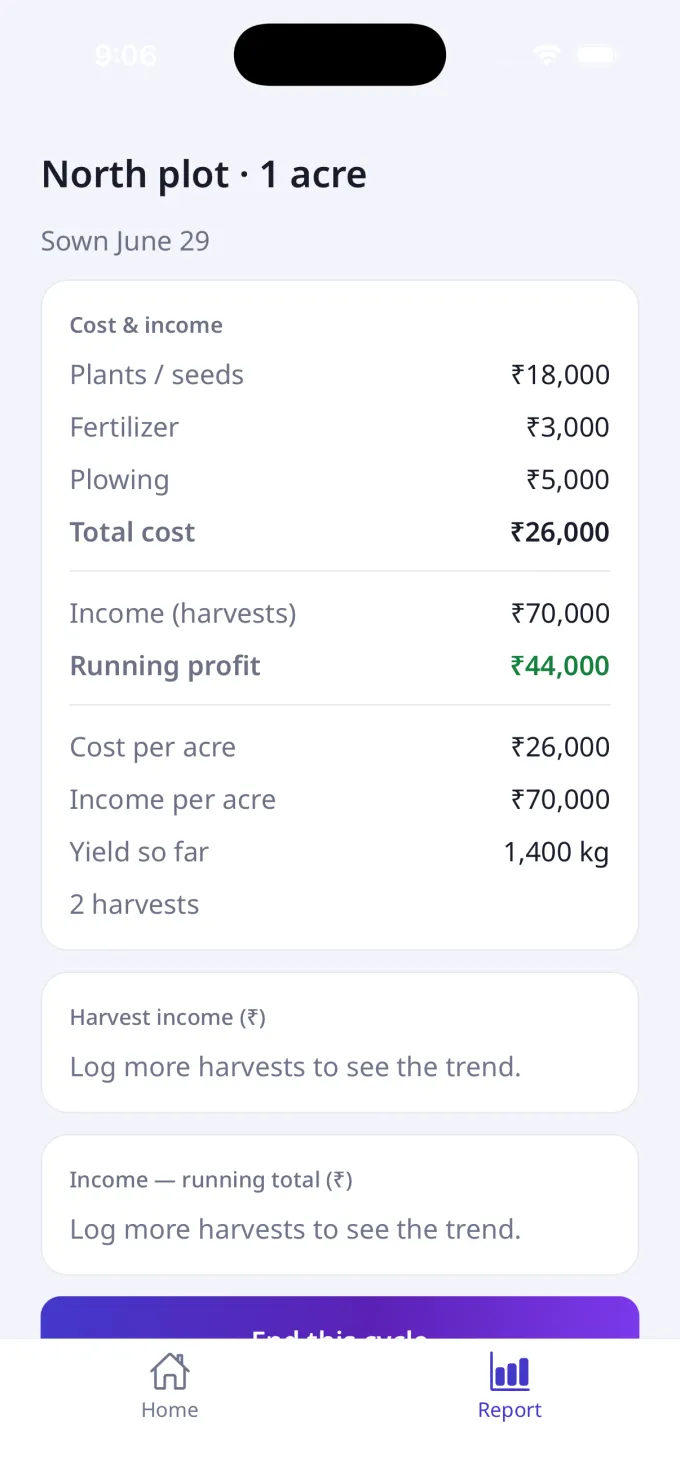
- Open a plot from the Report tab (or tap Total invested on Home). The Cost & income card breaks it all down: Plants / seeds, Fertilizer, Plowing and other costs, then Total cost, Income (harvests) and your Running profit.
- Below that are the per-acre figures — Cost per acre and Income per acre — plus Yield so far in kg and a N harvests count.
- When the season is over, tap End this cycle and confirm Yes, end it. This closes the cycle — the profit becomes final and no more entries can be added.
23 Enter today's totals
The fastest way to log a whole day — one screen, one Save.
- On Home tap Enter today's totals (the calendar tile), or the same button on the No day logged yet card. The daily-selling app has two tabs at the bottom — Home and Report.
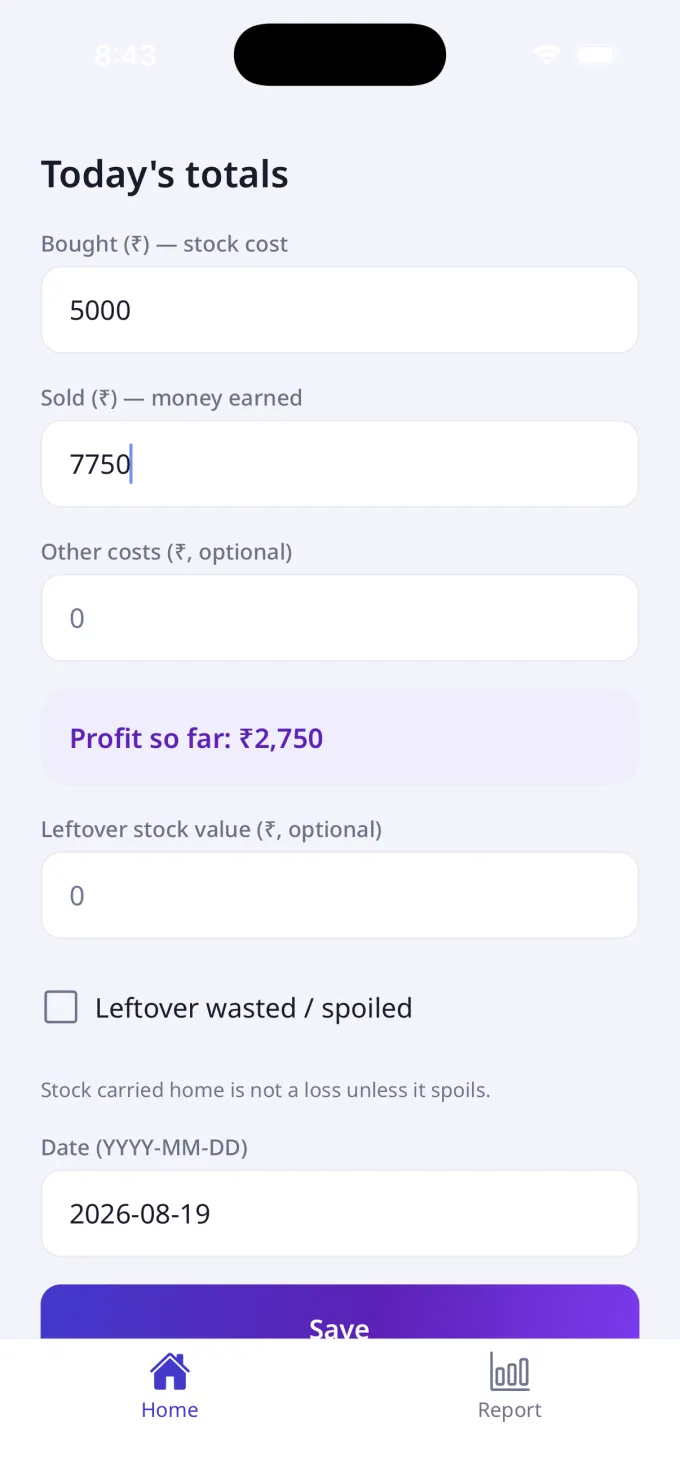
- Type Bought (₹) — stock cost (what your stock cost you), Sold (₹) — money earned, and any Other costs (₹, optional) like the cart, ice or transport.
- Watch the Profit so far: ₹… box update live as you type — it is Sold minus Bought minus other costs.
- If stock is left over, enter its Leftover stock value (₹, optional). Leave Date (YYYY-MM-DD) as today (or edit it) and tap Save.
24 Log item-by-item
Prefer a record of each buy and sale? Log them one at a time.
- From Home tap Add purchase, Add sale or Add expense — all three open the same screen.
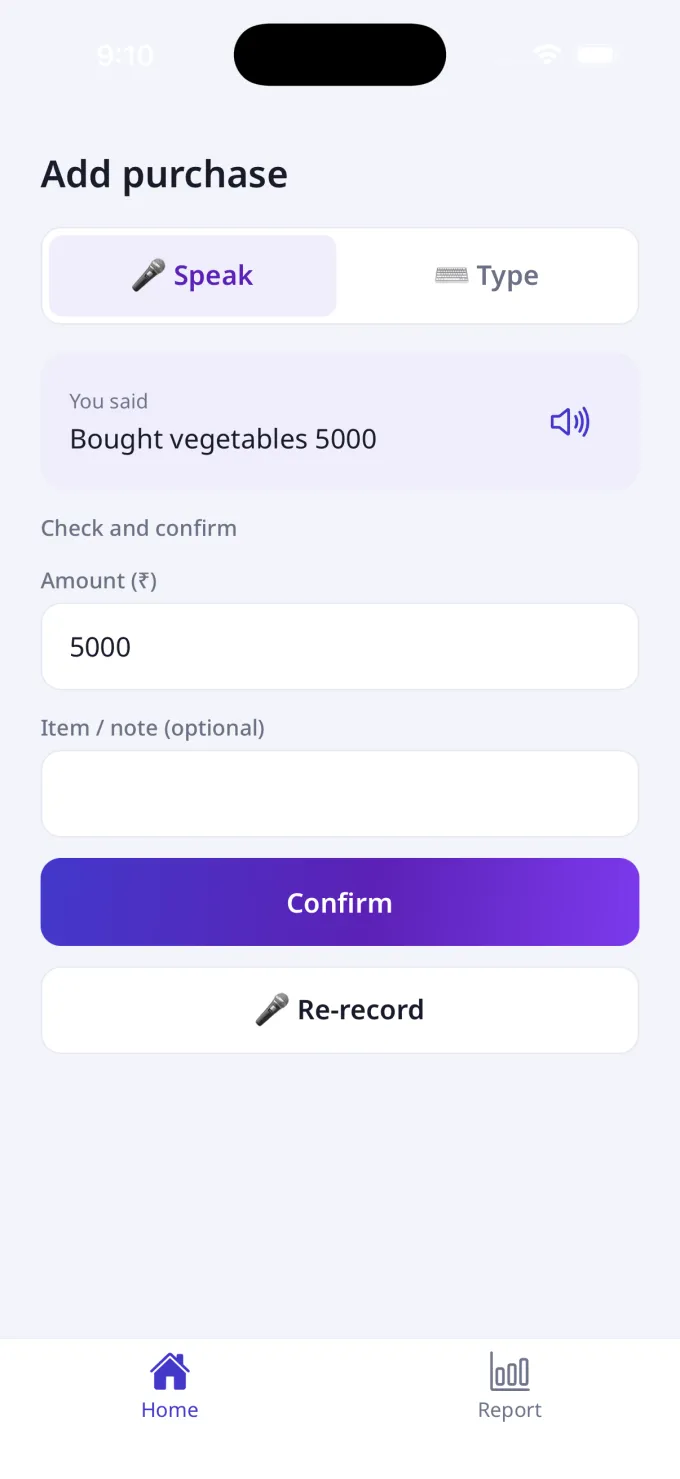
- Keep 🎤 Speak selected and tap the mic, then say it naturally — for example “Bought vegetables 5000” — or tap ⌨️ Type to enter it by hand.
- The app shows You said… and fills in the Amount (₹), with an optional Item / note (optional). Fix anything, then tap Confirm.
- After a sale it shows Sale added with Add another sale — handy for logging many sales through the day. Purchases and expenses just return to Home.
25 Leftover stock
Carried-home stock is not a loss — only spoiled stock is.
- On the Today's totals screen, enter the value of any unsold stock in Leftover stock value (₹, optional).
- Tick Leftover wasted / spoiled only if that stock was actually thrown away. If you carried it home to sell tomorrow, leave it unticked.
- Either way your profit stays the same — leftover value never reduces it. The tick only labels the day, so the detail view can show the stock as Carried over or Wasted.
26 Weekly & monthly report
Every selling day, with your profit trend at a glance.
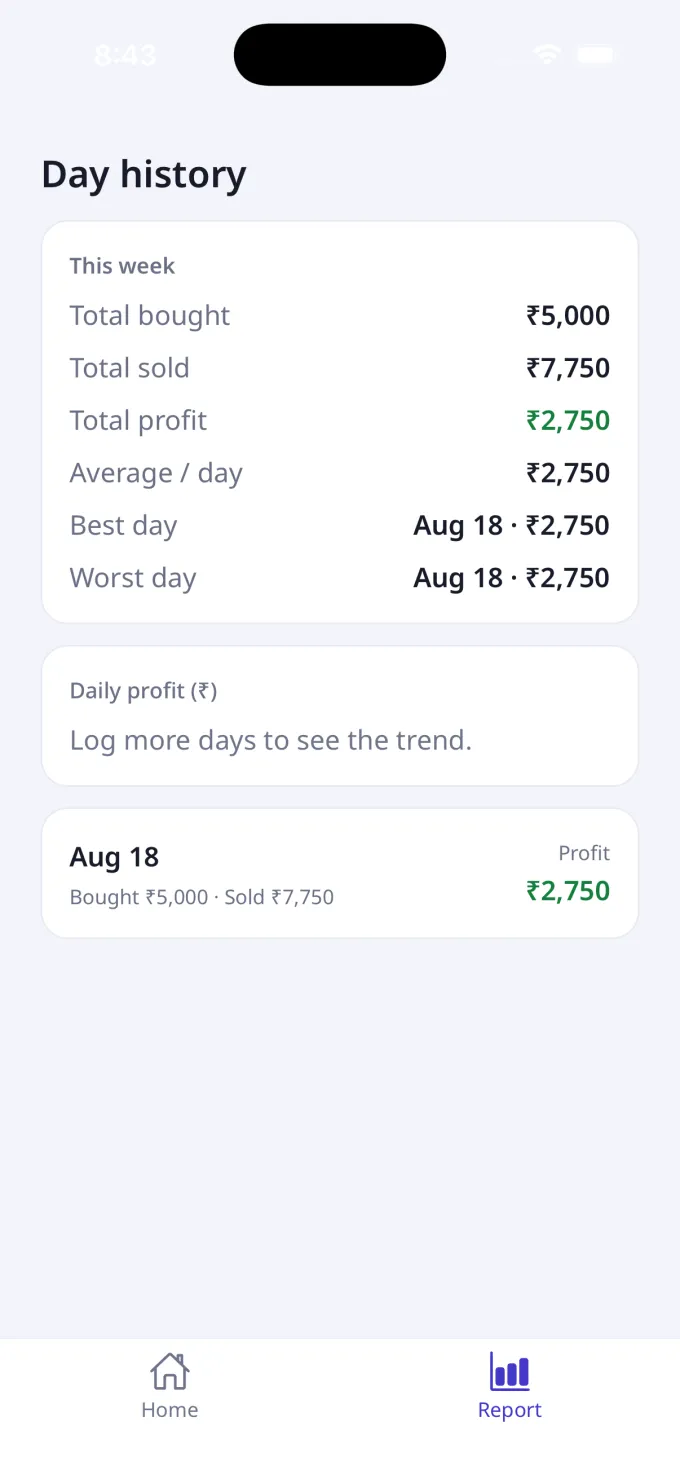
- Tap the Report tab. The Day history screen opens with a This week card: Total bought, Total sold, Total profit and Average / day, plus your Best day and Worst day.
- The Daily profit (₹) chart draws your trend once you have logged two or more days.
- Below, each day is a card showing the date, Bought ₹… · Sold ₹… and its Profit in green or red. Tap a day to open its full detail.
27 Speak an entry
Just say it — the app writes it down for you.
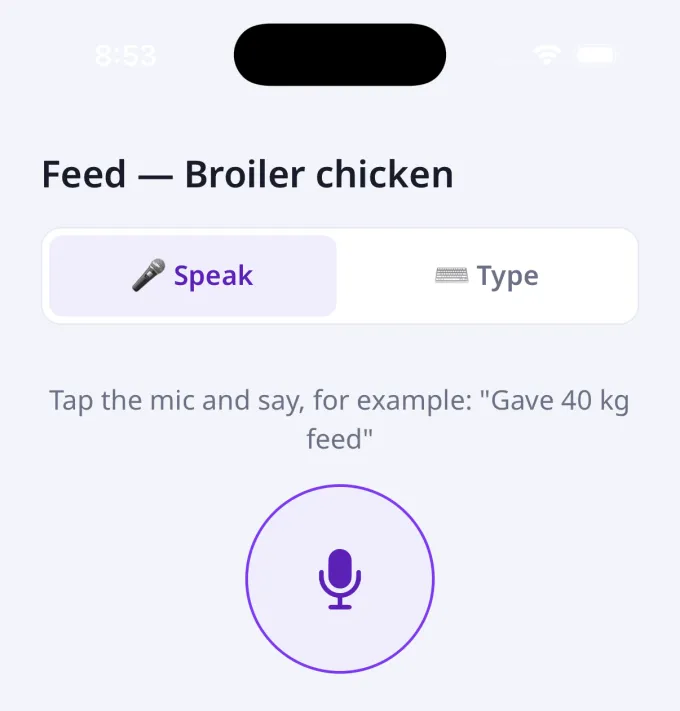
- Every entry screen has two tabs at the top: 🎤 Speak and ⌨️ Type. Speak is already selected, so you're ready to talk.
- Tap the big mic and say it naturally in your own language — for example, “500 chicks at ₹32 each.” The button shows “Listening — tap again when done.”
- Tap the mic again to stop. The app shows “Understanding…” for a moment, then fills in the numbers for you.
28 Check and confirm
The app reads it back so you always know it heard you right.
- After you speak, the app shows “You said…” with your words, and reads the summary back to you aloud — tap the speaker icon to hear it again.
- It fills in the fields under Check and confirm. Wrong number, or a blank showing “Not heard — please fill in”? Tap the field and fix it.
- All correct? Tap Confirm to save. Want to say it again? Tap 🎤 Re-record.
29 Works offline, syncs later
No internet? No problem — everything saves on your phone first.
- Farm Khata saves every entry on your phone the moment you confirm it, so it works with no internet — in the shed, out in the field, or at the market.
- While you're offline, the header shows an Offline pill and each new entry carries an amber ⏳ Not synced chip.
- When you're back online, the app uploads on its own — the header briefly shows Syncing… and then the chips clear automatically.
30 Switch your language
Use Farm Khata in the language you're most comfortable with.
- Farm Khata speaks 12 languages: English, Hindi, Bengali, Marathi, Telugu, Tamil, Gujarati, Kannada, Malayalam, Odia, Punjabi and Assamese — each shown in its own script.
- You choose one during setup, on the Choose your language screen. Tapping a language switches the whole app instantly as a live preview.
- You can change it anytime later from the language switcher in the app's top bar — pick a language in the sheet and the app switches at once.